简介
本文是《玩转Qml》系列文章的第七篇,涛哥会罗列Qt中的所有自绘方案,并提供一些案例和说明。
Qt自带的组件,外观都是固定的,一般可以通过qss/Qml style等方式进行定制。
如果要实现外观特殊的组件,就需要自己绘制了。
源码
《玩转Qml》系列文章,配套了一个优秀的开源项目:TaoQuick
github https://github.com/jaredtao/TaoQuick
访问不了或者速度太慢,可以用国内的镜像网站gitee
https://gitee.com/jaredtao/TaoQuick
自绘方案
Qt中的自绘方案有这么一些:
- QWidget+QPainter / QQuickPaintedItem+QPainter
- Qml Canvas
- Qml Shapes
- QOpenGLWidget / QOpenGLWindow
- Qml QQuickFrameBufferObject
- Qml SceneGraph
- Qml ShaderEffect
- QVulkanWindow
(GraphicsView和QWidget的绘制类似,就不讨论了)
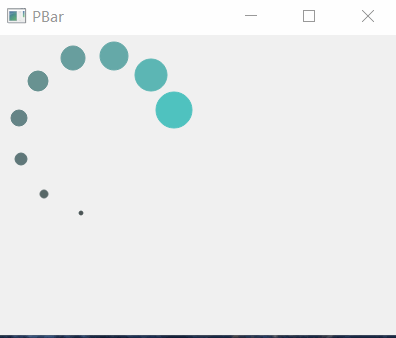
QPainter
QPainter是一个功能强大的画笔,QWidget中的各种控件如QPushButton、QLable等都是用QPainter画出来的。
(QWidget的控件在绘制时,还增加了qss样式表,让UI定制变得更加方便。)
QWidget中使用QPainter的方法,是重载paintEvent事件,这里示例绘制一个进度条:
1
2
3
4
5
6
7
8
9
10
11
12
13
14
15
16
17
18
19
|
#pragma once
#include <QMainWindow>
class MainWindow : public QMainWindow
{
Q_OBJECT
public:
MainWindow(QWidget *parent = 0);
~MainWindow();
protected:
void paintEvent(QPaintEvent *event) override;
void timerEvent(QTimerEvent *event) override;
private:
QList<QColor> mColorList;
int mCurrent = 0;
};
|
1
2
3
4
5
6
7
8
9
10
11
12
13
14
15
16
17
18
19
20
21
22
23
24
25
26
27
28
29
30
31
32
33
34
35
36
37
38
39
40
41
42
43
44
45
46
47
48
49
50
51
52
53
54
55
56
57
58
59
60
|
#include "MainWindow.h"
#include <QPainter>
#include <QtMath>
MainWindow::MainWindow(QWidget *parent)
: QMainWindow(parent)
{
resize(400, 300);
mColorList << QColor(51, 52, 54)
<< QColor(75, 85, 86)
<< QColor(87, 103, 103)
<< QColor(95, 119, 121)
<< QColor(101, 132, 134)
<< QColor(104, 146, 145)
<< QColor(104, 158, 158)
<< QColor(101, 169, 168)
<< QColor(92, 182, 180)
<< QColor(79, 194, 191);
startTimer(1000 / 60);
}
MainWindow::~MainWindow()
{
}
void MainWindow::timerEvent(QTimerEvent *) {
mCurrent =(mCurrent + 3) % 360;
update();
}
void MainWindow::paintEvent(QPaintEvent *event)
{
QPainter painter(this);
painter.setRenderHints(QPainter::Antialiasing|QPainter::TextAntialiasing);
qreal a = 100;
qreal b = 100;
qreal r = 80;
qreal roffset = 2;
qreal angleOffset = 30;
qreal currentangle = mCurrent ;
for (int i = 0; i < mColorList.length(); i++) {
qreal r0 = i * roffset;
qreal angle = currentangle + i * angleOffset;
qreal x0 = r * cos(qDegreesToRadians(angle)) + a;
qreal y0 = r * sin(qDegreesToRadians(angle)) + b;
painter.setPen(mColorList[i]);
painter.setBrush(QBrush(mColorList[i]));
painter.drawEllipse(x0 - r0, y0 - r0, 2 * r0, 2 * r0);
}
}
|
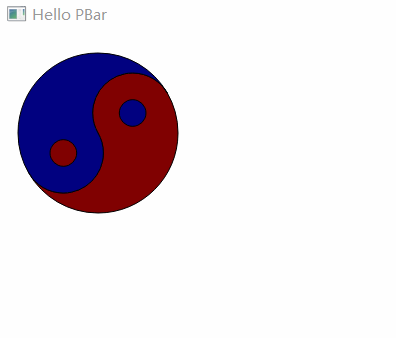
QQuickPaintedItem+QPainter 示例
QQuickPaintedItem继承自QQuickItem,而QQuickItem就是Qml中的Item。
QQuickPaintedItem通过重载paint函数,就可以使用QPainter绘制。
自定义的QQuickPaintedItem子类需要注册到Qml中才能使用,注册类型或者注册实例都可以,具体可以参考《 Qml组件化编程5-Qml与C++交互》
这里示例QQuickPaintedItem 中使用 QPainter绘制一个阴阳八卦:
1
2
3
4
5
6
7
8
9
10
11
12
13
14
15
16
17
|
#pragma once
#include <QQuickPaintedItem>
class PBar : public QQuickPaintedItem
{
Q_OBJECT
public:
PBar(QQuickItem *parent = nullptr);
void paint(QPainter *painter) override;
void timerEvent(QTimerEvent *event) override;
private:
QList<QColor> mColorList;
int mCurrent = 0;
};
|
1
2
3
4
5
6
7
8
9
10
11
12
13
14
15
16
17
18
19
20
21
22
23
24
25
26
27
28
29
30
31
32
33
34
35
36
37
38
39
40
41
42
43
44
45
46
47
48
49
50
51
52
53
54
55
56
57
58
59
60
61
62
63
64
65
66
67
68
69
70
71
72
73
74
75
76
77
78
79
80
81
82
83
84
85
86
87
88
89
90
91
92
93
94
95
96
97
98
|
#include "PBar.h"
#include <QPainter>
#include <QtMath>
PBar::PBar(QQuickItem *parent) : QQuickPaintedItem (parent)
{
mColorList << QColor(51, 52, 54)
<< QColor(75, 85, 86)
<< QColor(87, 103, 103)
<< QColor(95, 119, 121)
<< QColor(101, 132, 134)
<< QColor(104, 146, 145)
<< QColor(104, 158, 158)
<< QColor(101, 169, 168)
<< QColor(92, 182, 180)
<< QColor(79, 194, 191);
startTimer(1000 / 60);
}
void PBar::paint(QPainter *painter)
{
qreal a = 100;
qreal b = 100;
qreal r = 80;
qreal r1 = r / 2;
qreal r2 = r / 6;
qreal currentangle = mCurrent;
painter->save();
painter->setRenderHints(QPainter::Antialiasing|QPainter::TextAntialiasing);
{
painter->setBrush(QBrush(QColor(128, 1, 1)));
QPainterPath path(QPointF(a + r * cos(qDegreesToRadians( currentangle )), b - r * sin(qDegreesToRadians(currentangle ))));
path.arcTo(a - r, b - r,
r * 2, r * 2,
currentangle, 180);
path.arcTo(a + r1 * cos(qDegreesToRadians(currentangle + 180)) - r1, b - r1 * sin(qDegreesToRadians(currentangle + 180)) - r1,
r1 * 2, r1 * 2,
currentangle + 180, 180);
path.arcTo(a + r1*cos(qDegreesToRadians(currentangle)) - r1, b - r1 * sin(qDegreesToRadians(currentangle)) - r1,
r1 * 2, r1 * 2,
currentangle + 180, -180
);
painter->drawPath(path);
}
{
painter->setBrush(QBrush(QColor(1, 1, 128)));
QPainterPath path(QPointF(a + r * cos(qDegreesToRadians( currentangle )), b - r * sin(qDegreesToRadians(currentangle ))));
path.arcTo(a - r, b - r,
r * 2, r * 2,
currentangle, -180);
path.arcTo(a + r1 * cos(qDegreesToRadians(currentangle + 180)) - r1, b - r1 * sin(qDegreesToRadians(currentangle + 180)) - r1,
r1 * 2, r1 * 2,
currentangle + 180, 180);
path.arcTo(a + r1*cos(qDegreesToRadians(currentangle)) - r1, b - r1 * sin(qDegreesToRadians(currentangle)) - r1,
r1 * 2, r1 * 2,
currentangle + 180, -180
);
painter->drawPath(path);
}
{
painter->setBrush(QBrush(QColor(128, 1, 1)));
QPainterPath path;
path.addEllipse(a + r1 * cos(qDegreesToRadians(currentangle)) - r2, b - r1 * sin(qDegreesToRadians(currentangle )) - r2,
r2 * 2, r2 * 2);
painter->drawPath(path);
}
{
painter->setBrush(QBrush(QColor(1, 1, 128)));
QPainterPath path;
path.addEllipse(a + r1 * cos(qDegreesToRadians(180 + currentangle)) - r2, b - r1 * sin(qDegreesToRadians(180 + currentangle)) - r2,
r2 * 2, r2 * 2);
painter->drawPath(path);
}
painter->restore();
}
void PBar::timerEvent(QTimerEvent *event)
{
(void)event;
mCurrent =(mCurrent + 3) % 360;
update();
}
|
1
2
3
4
5
6
7
8
9
10
11
12
13
14
15
16
17
18
19
20
21
|
#include <QGuiApplication>
#include <QQmlApplicationEngine>
#include "PBar.h"
int main(int argc, char *argv[])
{
QCoreApplication::setAttribute(Qt::AA_EnableHighDpiScaling);
QGuiApplication app(argc, argv);
qmlRegisterType<PBar>("PBar", 1, 0, "PBar");
QQmlApplicationEngine engine;
const QUrl url(QStringLiteral("qrc:/main.qml"));
QObject::connect(&engine, &QQmlApplicationEngine::objectCreated,
&app, [url](QObject *obj, const QUrl &objUrl) {
if (!obj && url == objUrl)
QCoreApplication::exit(-1);
}, Qt::QueuedConnection);
engine.load(url);
return app.exec();
}
|
1
2
3
4
5
6
7
8
9
10
11
12
13
14
|
import QtQuick 2.0
import QtQuick.Window 2.0
import PBar 1.0
Window {
visible: true
width: 640
height: 480
title: qsTr("Hello PBar")
PBar {
anchors.fill: parent
}
}
|
关于QPainter
QPainter底层使用CPU做光栅化渲染,这种方式在没有GPU的设备中能够很好地工作。
(我的好友”Qt侠-刘典武”就是这方面的实战专家,他手上有将近150个精美的自绘组件,比官方还要多,有需要的同学可以联系他 QQ517216493)
然而时代在飞速发展,很多设备都带上了GPU,QPainter在GPU设备上,将不能发挥GPU的全部实力。
(刘典武也在积极跟进GPU绘制)
这里提一下,有个叫QUItCoding的组织,开发了一套QNanoPainter,接口和QPainter一致,
在大部分场景下都拥有不错的性能。其底层是基于nanovg的GPU加速。
不过QNanoPainter并没有合并进Qt官方,具体原因不清楚, 有可能是因为性能并不是100%达标的。
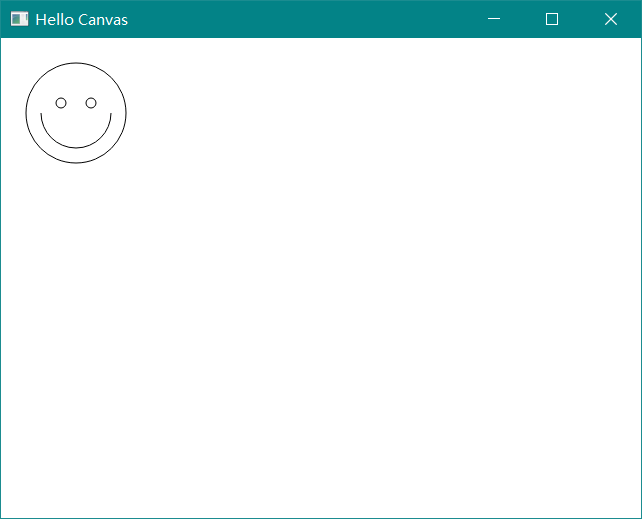
Qml Canvas
Qml中提供了Canvas组件,接口和html中的Canvas基本一致,可以直接copy html中的Canvas代码(极少部分不能用)。
当然QPainter实现的功能,也都可以移植到Canvas中。
Canvas渲染性能并不太好,如果有性能要求,还是不要用Canvas了。
这里示例绘制一个笑脸
1
2
3
4
5
6
7
8
9
10
11
12
13
14
15
16
17
18
19
20
21
22
23
24
25
26
27
28
29
30
|
import QtQuick 2.0
import QtQuick.Window 2.0
Window {
visible: true
width: 640
height: 480
title: qsTr("Hello Canvas")
Canvas {
id: canvas
anchors.fill: parent
onPaint: {
var ctx = canvas.getContext('2d');
ctx.beginPath();
ctx.arc(75,75,50,0,Math.PI*2,true);
ctx.moveTo(110,75);
ctx.arc(75,75,35,0,Math.PI,false);
ctx.moveTo(65,65);
ctx.arc(60,65,5,0,Math.PI*2,true);
ctx.moveTo(95,65);
ctx.arc(90,65,5,0,Math.PI*2,true);
ctx.stroke();
}
}
}
|
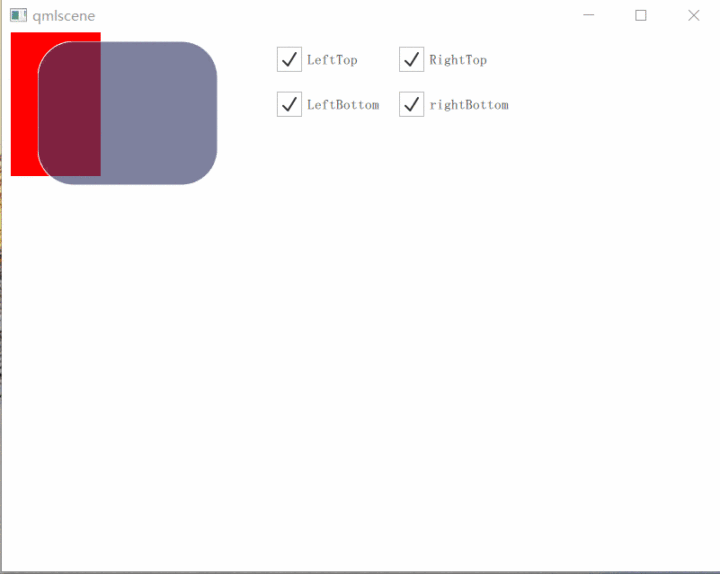
Qml Shapes
Qt5.10开始,Qml增加了Quick.Shapes功能。这是目前官方提供的自绘途径中,兼顾性能和易用性的最佳选择。
Shapes底层为GPU渲染(基于SceneGraph),QPainter能绘制的基础图元,都可以用Shapes实现。Shapes再配合上Qml中的
属性绑定和属性动画,可以轻易实现各式各样的动态、酷炫的UI。
(后续的自定义组件,涛哥将会优先使用Shapes。)
这里示例实现一个任意圆角的Rectangle组件:
1
2
3
4
5
6
7
8
9
10
11
12
13
14
15
16
17
18
19
20
21
22
23
24
25
26
27
28
29
30
31
32
33
34
35
36
37
38
39
40
41
42
43
44
45
46
47
48
49
50
51
52
53
54
55
56
57
58
59
60
61
62
63
64
65
66
67
68
69
70
71
72
73
74
75
76
77
78
|
import QtQuick 2.12
import QtQuick.Controls 2.5
import QtQuick.Shapes 1.12
Shape {
id: root
property bool leftTopRound: true
property bool leftBottomRound: true
property bool rightTopRound: true
property bool rightBottomRound: true
property real radius
property color color: "red"
layer.enabled: true
layer.samples: 8
smooth: true
antialiasing: true
ShapePath {
fillColor: color
startX: leftTopRound ? radius : 0
startY: 0
fillRule: ShapePath.WindingFill
PathLine {
x: rightTopRound ? root.width - radius : root.width
y: 0
}
PathArc {
x: root.width
y: rightTopRound ? radius : 0
radiusX: rightTopRound ? radius : 0
radiusY: rightTopRound ? radius : 0
}
PathLine {
x: root.width
y: rightBottomRound ? root.height - radius : root.height
}
PathArc {
x: rightBottomRound ? root.width - radius : root.width
y: root.height
radiusX: rightBottomRound ? radius : 0
radiusY: rightBottomRound ? radius : 0
}
PathLine {
x: leftBottomRound ? radius : 0
y: root.height
}
PathArc {
x: 0
y: leftBottomRound ? root.height - radius : root.height
radiusX: leftBottomRound ? radius : 0
radiusY: leftBottomRound ? radius : 0
}
PathLine {
x: 0
y: leftTopRound ? radius : 0
}
PathArc {
x: leftTopRound ? radius : 0
y: 0
radiusX: leftTopRound ? radius : 0
radiusY: leftTopRound ? radius : 0
}
}
}
|
看一下TRoundRect的用法
1
2
3
4
5
6
7
8
9
10
11
12
13
14
15
16
17
18
19
20
21
22
23
24
25
26
27
28
29
30
31
32
33
34
35
36
37
38
39
40
41
42
43
44
45
46
47
48
49
50
51
52
53
54
| import QtQuick 2.0
import QtQuick.Controls 2.5
Rectangle {
width: 800
height: 600
Rectangle {
x: 10
width: 100
height: 160
color: "red"
}
TRoundRect {
id: roundRect
x: 40
y: 10
width: 200
height: 160
radius: 40
leftTopRound: lt.checked
rightTopRound: rt.checked
leftBottomRound: lb.checked
rightBottomRound: rb.checked
color: "#A0333666"
}
Grid {
x: 300
y: 10
columns: 2
spacing: 10
CheckBox {
id: lt
text: "LeftTop"
checked: true
}
CheckBox {
id: rt
text: "RightTop"
checked: true
}
CheckBox {
id: lb
text: "LeftBottom"
checked: true
}
CheckBox {
id: rb
text: "rightBottom"
checked: true
}
}
}
|
有的同学学习过OpenGL这类图形渲染API,Qt为OpenGL提供了便利的窗口和上下文环境。
QOpenGLWidget用来在QWidget框架中集成OpenGL渲染,QOpenGLWindow用在Qml框架。
使用方法都是子类重载下面三个函数:
1
2
3
4
5
| void initializeGL();
void paintGL();
void resizeGL(int w, int h);
|
这里可以参考官方的示例:
QOpenGLWidget示例
QOpenGLWindow示例
Qt对OpenGL系列的函数都做了封装,一般使用QOpenGLFunctions就够了,QOpenGLFunctions是基于OpenGL ES 2.0 API的跨平台实现,删减了个别API。
相应的有一个未删减的OpenGLES2 的封装:QOpenGLFunctions_ES2。
当然为了兼容所有OpenGL版本,Qt分别封装了相应的类
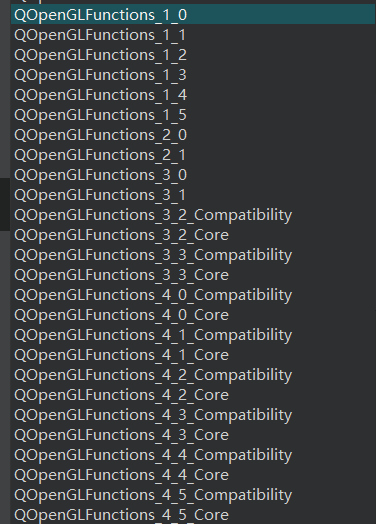
有特殊版本需要的时候,可以把QOpenGLFunctions换成相应的类。
还有一个OpenGL ES3.0的封装, QOpenGLExtraFunctions,可以在支持OpenGL ES 3.0的设备上使用。
使用这些functions,一定要在有OpenGL上下文环境的地方,先调用一下initializeOpenGLFunctions。有些版本的init有返回值的,要注意判断并处理。
Qml SceneGraph
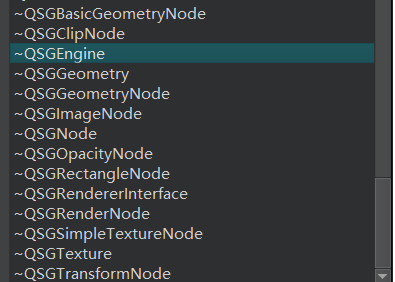
Qml基于GPU实现了一套渲染框架,这个框架就是SceneGraph。
SceneGraph提供了很多GPU渲染相关的功能,以方便进行自绘制,都是以QSG开头的类,如下图所示:
使用方式是在QQuickItem的子类中,重载updatePaintNode函数:
1
2
3
4
5
6
7
8
9
10
| QSGNode *TaoItem::updatePaintNode(QSGNode *node, UpdatePaintNodeData *)
{
QSGSimpleRectNode *n = static_cast<QSGSimpleRectNode *>(node);
if (!n) {
n = new QSGSimpleRectNode();
n->setColor(Qt::red);
}
n->setRect(boundingRect());
return n;
}
|
在使用Qml框架的程序中,使用这些QSG功能,将自定义渲染直接加入SceneGraph框架的渲染流程,无疑是性能最优的。
不过问题在于,这些QSG有点难以使用。需要有一定的OpenGL或DirectX相关图形学知识,并理解SceneGraph的节点交换机制,才能用好。
而懂OpenGL的人,有更好的选择,就是直接使用OpenGL的API。下面的QQuickFrameBufferObject就是一种途径。
Qml QQuickFrameBufferObject
QQuickFramebufferObject继承于QQuickItem(Qml中将它当作一个Item就可以了),用来在一个framebuffer object(FBO)上做渲染,
SceneGraph框架会将这个FBO渲染到屏幕上。
使用的方式是,实现一个QQuickFramebufferObject::Renderer类。
这个类里面始终是拥有OpenGL上下文环境的,内存也是被SceneGraph框架管理的,只要理解了渲染流程,用起来还是很方便的。
涛哥在Qml中集成 视频播放器 和 3D模型渲染的时候,就使用了这个FBO。
可以参考这两个例子:
Qml渲染3D模型
FFmpeg解码,Qml/OpenGL转码渲染
Qml ShaderEffect
学习过图形学的人,都应该听说过大名鼎鼎的Shadertoy
只要一点奇妙的Shader代码,就能渲染出各种酷炫的效果。
Qml中提供了ShaderEffect组件,就可以用来做ShaderToy那样的特效。
可以参考qyvlik的代码仓库:
qyvlik-ShaderToy.qml
以及我很久以前写的例子:
Tao-ShaderToy
360能量球
Qml中还有个神奇的ShaderEffectSource,可以用在普通Item的layer.effect中,
比如这个例子,就用ShaderEffectSource做了倒影特效:
倒影特效
QVulkanWindow
OpenGL的下一代,已经进化为vulkan了。
Qt 5.10开始,也提供了vulkan的支持。
涛哥水平有限,这次只提一下,就先不展开说了。
 支付宝打赏
支付宝打赏
 微信打赏
微信打赏